Servicing Greater Tewksbury, MA and Surrounding Towns

Brick Stair Repair: Top 7 Proven Solutions for 2024


Importance of Brick Stair Repair

Brick stair repair is not just a matter of aesthetics—it’s essential for safety and structural integrity. Loose, cracked, or missing bricks can create tripping hazards and potential accidents. Ensuring your brick stairs are in good condition can prevent these dangers and maintain the visual appeal of your property.

Quick Fixes for Brick Stair Repair:

  1. Loose bricks: Re-secure with fresh mortar.
  2. Cracked bricks: Replace with new ones.
  3. Missing bricks: Install replacements in the affected spots.
  4. Mortar issues: Repoint the joints with new mortar.

Addressing these issues promptly can save time and money in the long run. Water and weather are common culprits behind the damage. Moisture can seep into tiny cracks, freeze and expand, further weakening the structure.

As the owner of McLeod Landscaping, I’ve spent over 30 years restoring brick stairs to their former glory. With experience in brick stair repair, I can help you understand and manage your brick stair issues effectively.

Brick stair repair steps for fixing loose, cracked, or missing bricks - brick stair repair infographic pillar-3-steps

Let’s dive deeper into how you can assess and repair your brick stairs in the following sections.

Quick look at brick stair repair:
brick veneer stairs
how to build brick stairs outside
interlocking brick stairs

Assessing Damage to Brick Stairs

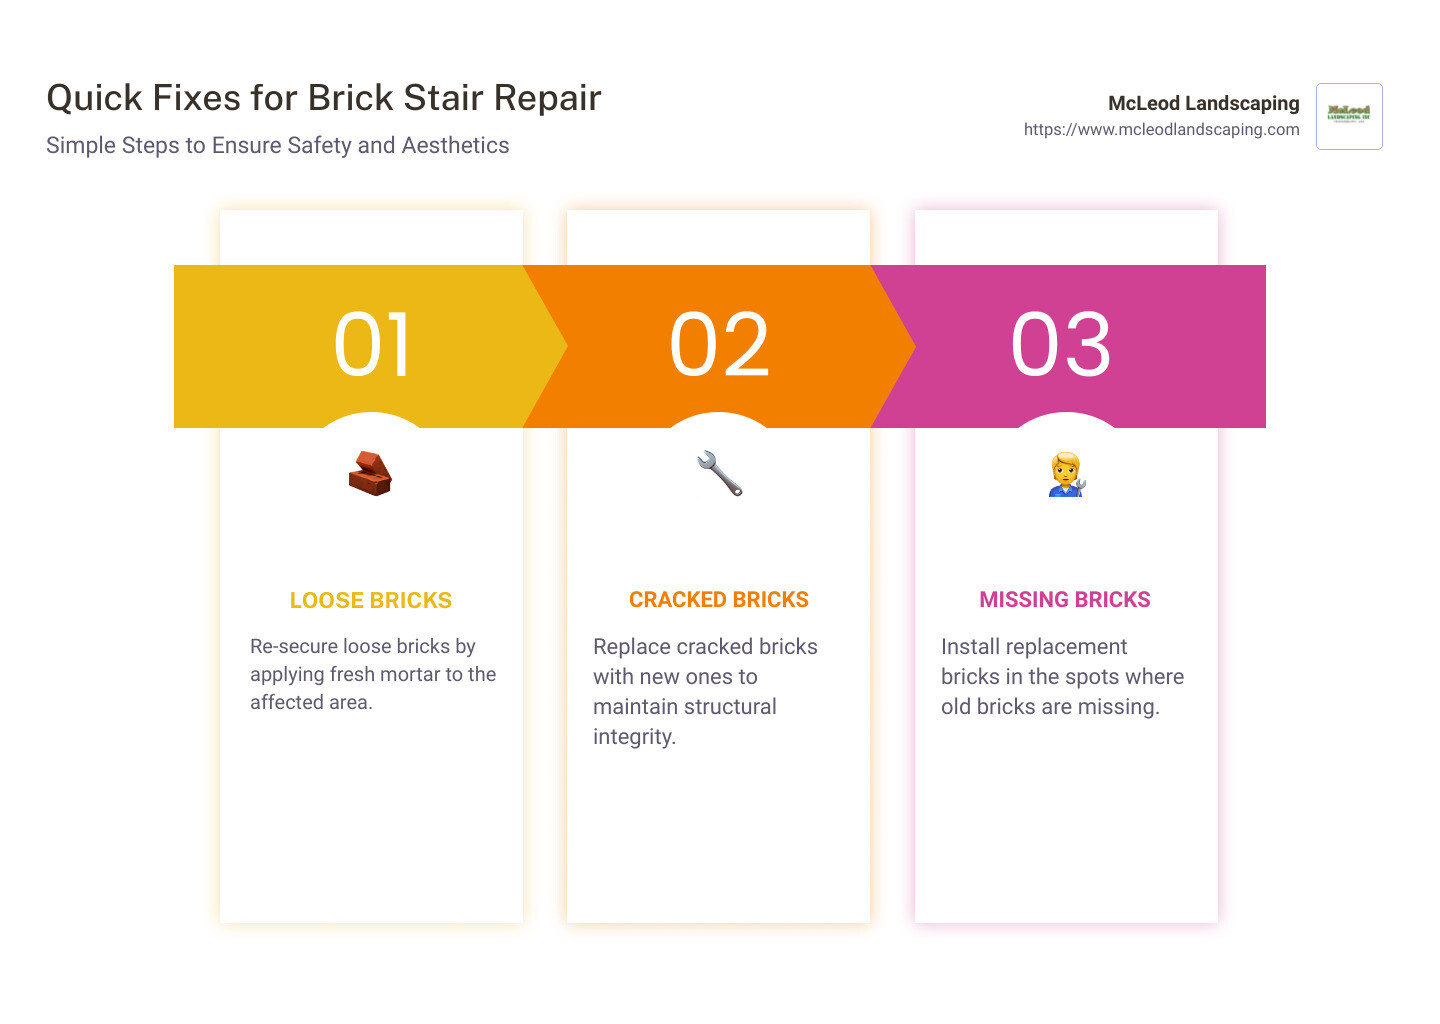
Before diving into repairs, you need to assess the damage to your brick stairs. Understanding the type of damage will help you choose the right repair method. Here are the common issues you might encounter:

Loose Bricks

Loose bricks are a common problem, often caused by deteriorating mortar. When bricks become loose, they can pose serious tripping hazards.

How to Identify:
– Wiggle the bricks gently to see if they move.
– Look for gaps between bricks and mortar.

Cracked Bricks

Cracked bricks can weaken the structure of your stairs. Cracks usually result from freeze-thaw cycles, where water seeps into the brick, freezes, and expands.

How to Identify:
– Visible cracks on the surface of the bricks.
– Bricks that break apart when pressure is applied.

Missing Bricks

Missing bricks are a glaring issue that needs immediate attention. They can compromise the structural integrity of the stairs and create unsafe conditions.

How to Identify:
– Obvious gaps where bricks should be.
– Areas that look uneven or incomplete.

Mortar Issues

Mortar holds your bricks together. Over time, it can crack, crumble, or become loose, a process known as “spalling.” Repointing is the solution for deteriorating mortar.

How to Identify:
– Crumbling or powdery mortar.
– Gaps and cracks in the mortar joints.

Loose and Cracked Bricks - brick stair repair

Next Steps

Once you’ve identified the damage, you can move on to the appropriate repair method. Whether it’s repointing mortar, replacing bricks, or both, addressing these issues promptly will save you time and money in the long run.

In the next section, we’ll cover the tools and materials you’ll need for brick stair repair.

Tools and Materials for Brick Stair Repair

Repairing brick stairs requires a few essential tools and materials. Having the right equipment can make the process smoother and ensure a durable fix. Here are the key items you’ll need:

Safety Glasses

Safety should always come first. Safety glasses protect your eyes from flying debris when chiseling or grinding old mortar.

Tip: Choose glasses that wrap around the sides for maximum protection.

Trowel

A trowel is a versatile tool used to apply and smooth mortar. It’s crucial for spreading mortar evenly and ensuring a strong bond between bricks.

Tip: A trowel with a pointed end helps you reach tight corners.

Tuckpointing Tool

A tuckpointing tool is essential for repointing mortar joints. It helps you pack mortar tightly into joints, ensuring a solid and weatherproof seal.

Tip: Look for a tool with a comfortable grip to reduce hand fatigue.

Chisel

A chisel is used to remove old, damaged mortar. It’s also handy for loosening and removing broken bricks.

Tip: Use a cold chisel and a hammer for better control and efficiency.

Mortar Mix

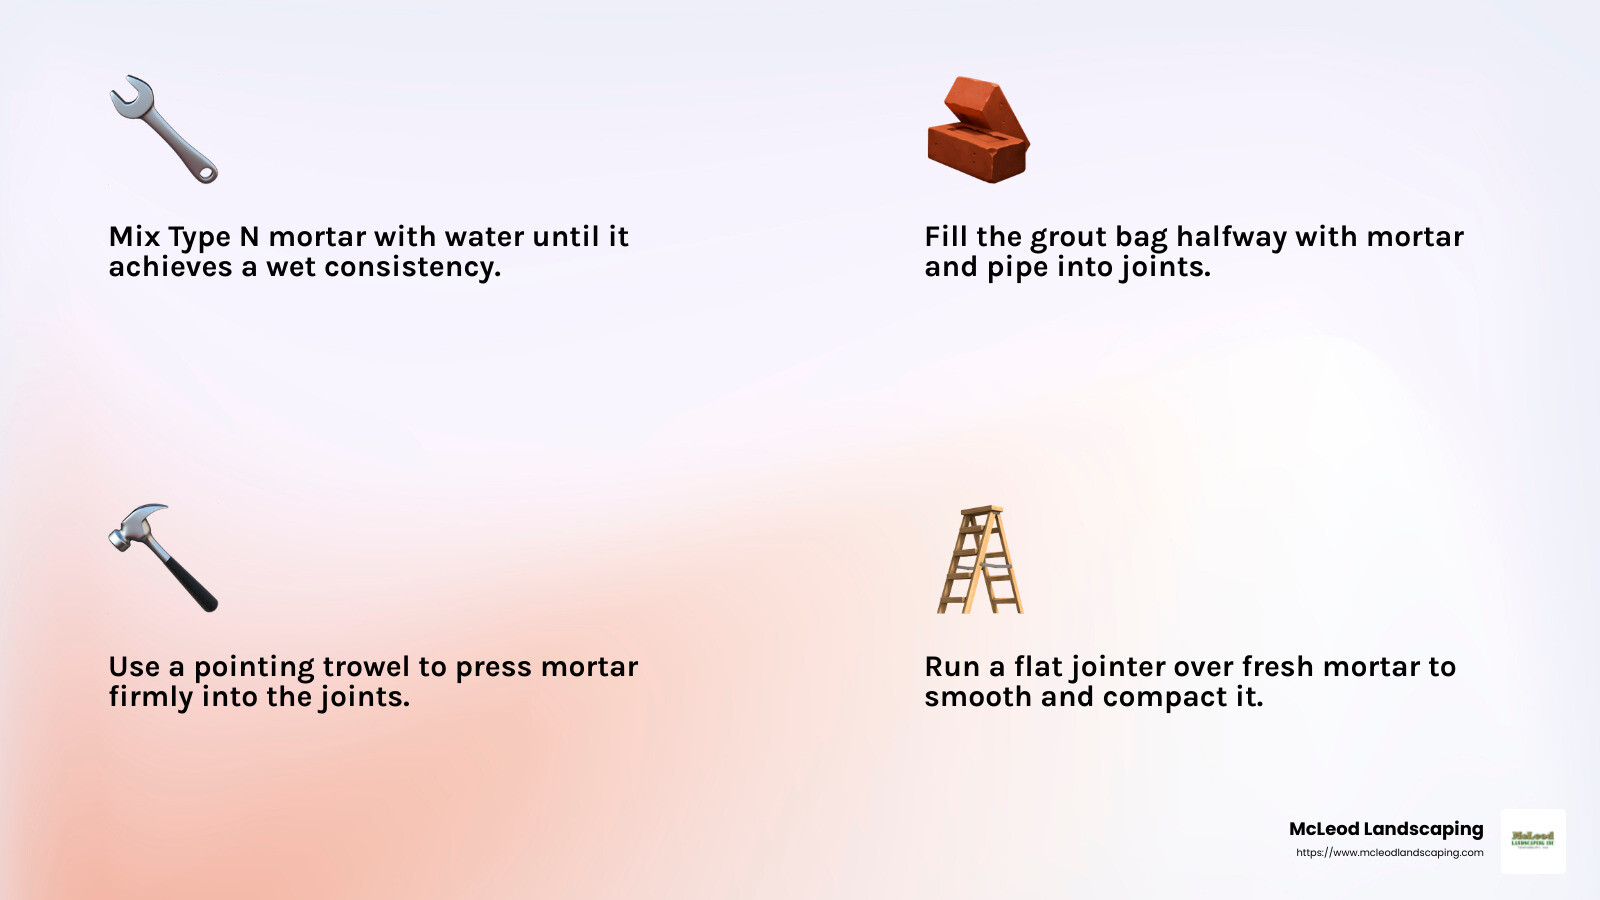
The right mortar mix is crucial for a durable repair. For brick stairs, you generally want Type N mortar, which is flexible enough to handle freeze-thaw cycles.

Tip: Mix the mortar to a wetter consistency for easier application through a grout bag.

Replacement Bricks

If you have broken or missing bricks, you’ll need replacement bricks. Make sure they match the size and color of your existing bricks.

Tip: Soak the bricks in water before installation to prevent them from absorbing moisture from the mortar too quickly.

Additional Supplies

  • Grout Bag: Useful for applying mortar neatly into joints.
  • Wire Brush: Helps clean excess mortar from bricks.
  • Garden Hose: Keeps the area clean and moist, aiding mortar adhesion.

By gathering these tools and materials, you’ll be well-prepared to tackle your brick stair repair project. In the next section, we’ll guide you through the step-by-step process of repointing brick stairs.

Step-by-Step Guide to Repointing Brick Stairs

Repointing brick stairs involves removing old mortar and applying new mortar to ensure a strong, weatherproof seal. Here’s a simple step-by-step guide to help you through the process.

Removing Old Mortar

  1. Cut Out the Old Mortar
  2. Tools Needed: Grinder with vacuum attachment, chisel, safety glasses
  3. Instructions: Use a grinder with a vacuum attachment to cut out the old mortar to a depth of ¾ inch. A chisel can also be used for smaller areas. Always wear safety glasses to protect your eyes from debris.
  4. Start with Horizontal Joints
  5. Instructions: Begin with the horizontal joints first. This method helps create pockets for the vertical joints and prevents the grinder blade from hitting the bricks.

Mixing Mortar

  1. Prepare the Mortar Mix
  2. Tools Needed: Type N mortar mix, water, mixing bucket
  3. Instructions: Mix Type N mortar with water in a bucket. Add small amounts of water gradually until you achieve a consistency that’s wetter than usual, especially if using a grout bag.

Applying New Mortar

  1. Load the Grout Bag
  2. Tools Needed: Grout bag
  3. Instructions: Fill the grout bag about halfway with the mixed mortar. Twist the open end closed to ensure the mortar doesn’t spill out.
  4. Squeeze Mortar into Joints
  5. Instructions: Use the grout bag to pipe mortar into the joints, similar to icing a cake. Make sure to fill the joints completely.
  6. Press Mortar with a Pointing Trowel
  7. Tools Needed: Pointing trowel
  8. Instructions: Use a pointing trowel to press the mortar firmly into the joints, ensuring a solid fill.

Slicking the Joint

  1. Use a Flat Jointer
  2. Tools Needed: Flat jointer
  3. Instructions: Run the flat jointer over the fresh mortar to smooth and compact it. This step ensures the joints are sealed and weatherproof.
  4. Brush Off Excess Mortar
  5. Tools Needed: Wire brush
  6. Instructions: Lightly brush off any excess mortar from the brick faces to keep the surface clean.
  7. Final Slicking
  8. Instructions: Make a final pass with the flat jointer to slick the joints, ensuring they are even and properly sealed. This step helps prevent water from entering and causing future damage.

By following these steps, you can effectively repoint your brick stairs, making them sturdy and weather-resistant.

Properly repointed brick stairs can last for decades, protecting your home and ensuring safety. - brick stair repair infographic 4_facts_emoji_light-gradient

Next, we’ll cover how to replace any loose or missing bricks in your stair repair project.

Replacing Loose or Missing Bricks

Replacing loose or missing bricks is essential for maintaining the integrity and safety of your brick stairs. Follow these steps to ensure a professional and durable repair.

Chiseling Old Mortar

  1. Remove the Existing Mortar
  2. Tools Needed: Chisel, hammer, safety glasses
  3. Instructions: Start by chiseling away the old mortar around the loose or missing brick. Use a hammer to tap the chisel gently but firmly. Always wear safety glasses to protect your eyes from flying debris.
  4. Clear the Area
  5. Instructions: Continue chiseling until all the old mortar is removed. This will open up the area and allow you to work the loose brick free or prepare the space for a new brick.

Cleaning the Area

  1. Brush Away Debris
  2. Tools Needed: Wire brush, shop vac
  3. Instructions: Use a wire brush to clean the area thoroughly. Remove any remaining mortar and dust. A shop vac can help suck up smaller particles, ensuring a clean workspace.
  4. Rinse with Water
  5. Tools Needed: Garden hose
  6. Instructions: Rinse the area with water to remove any leftover dust. This will also help the new mortar adhere better.

Applying Mortar

  1. Mix New Mortar
  2. Tools Needed: Type N mortar mix, water, mixing bucket
  3. Instructions: Mix the mortar according to the instructions on the package. Aim for a consistency that’s firm but workable.
  4. Apply Mortar in Layers
  5. Instructions: Use a brick trowel to apply the mortar in half-inch layers to the cleaned-out space. Ensure each layer is smooth and even.
  6. Prepare the Replacement Brick
  7. Tools Needed: Replacement brick, water
  8. Instructions: Dampen the replacement brick with water. This helps the mortar adhere better. Apply a thin layer of mortar to the brick itself.

Setting New Brick

  1. Insert the Replacement Brick
  2. Instructions: Carefully place the replacement brick into the prepared space. Wiggle it slightly to ensure it settles into the mortar properly.
  3. Fill Remaining Spaces
  4. Tools Needed: Trowel, pointing tool
  5. Instructions: Use a trowel and pointing tool to pack mortar into the spaces around the brick. Fill the joints until they are flush with the brick surface.
  6. Smooth the Joints
  7. Tools Needed: Flat jointer
  8. Instructions: Run a flat jointer over the fresh mortar to smooth and compact it. This ensures the joints are sealed and weatherproof.
  9. Wet the Area
  10. Tools Needed: Garden hose
  11. Instructions: Wet the area thoroughly with a garden hose to help the mortar cure properly.
  12. Allow to Dry
  13. Instructions: Let the mortar dry completely, which can take up to a week. Avoid putting pressure on the brick during this time. Periodically soak the area to maintain adhesion.

By following these steps, you can effectively replace loose or missing bricks, ensuring your brick stairs remain safe and visually appealing.

Next, we’ll discuss how to prevent future damage to your brick stairs.

Preventing Future Damage to Brick Stairs

Preventing future damage to your brick stairs is crucial for maintaining their safety and appearance over time. Here are some key strategies to keep your brick stairs in top condition:

Water Damage

Water is the biggest enemy of brick stairs. It can seep into tiny cracks and freeze during cold weather, causing the bricks and mortar to expand and crack.

  • Seal Cracks: Regularly inspect your brick stairs for any cracks or gaps. Seal them immediately to prevent water from getting in.
  • Improve Drainage: Ensure that water drains away from your stairs. Poor drainage can lead to water pooling around the base of your stairs, increasing the risk of damage.
  • Use Waterproofing Sealants: Apply a waterproof sealant to your brick stairs to create a barrier against water. This helps prevent water absorption and reduces the risk of freeze-thaw damage.

Weatherproofing

Weather can be harsh on brick stairs, especially in areas with extreme temperatures or heavy rainfall.

  • Cover Your Stairs: If possible, install a cover or awning over your brick stairs to protect them from direct exposure to rain and snow.
  • Regular Inspections: Conduct seasonal inspections to check for any signs of weather-related damage. Look for spalling (flaking or peeling of the brick surface) and address it promptly.

Regular Maintenance

Regular maintenance is essential for the longevity of your brick stairs.

  • Clean Debris: Keep your stairs clean by removing dirt, leaves, and other debris. Accumulated debris can hold moisture against the bricks, leading to damage.
  • Repointing: Check the mortar joints regularly. If you notice any loose or crumbling mortar, repointing (replacing the old mortar with new) can help maintain the structural integrity of your stairs.
  • Check for Efflorescence: Efflorescence is a white, powdery substance that appears on bricks. It’s caused by water drawing salts to the surface. While not harmful, it indicates moisture issues that need addressing.

Professional Help

Sometimes, DIY maintenance might not be enough.

  • Hire Professionals: For extensive damage or complex repairs, hiring professionals ensures the job is done correctly. Companies like McLeod Landscaping have the expertise to handle all aspects of brick stair repair and maintenance.

By implementing these preventive measures, you can significantly extend the life of your brick stairs and keep them looking their best.

Next, we’ll address some frequently asked questions about brick stair repair.

FAQs on Brick Stair Repair

Can Brick Steps Be Repaired?

Yes, brick steps can be repaired, but it depends on the extent of the damage. If you have loose, cracked, or spalling bricks, they can usually be replaced with new ones. If the problem is with the mortar joints—cracking, loose, or crumbling mortar—repointing (replacing the old mortar with new) is the solution. Understanding the specific issue will guide the repair process.

How Much Does It Cost to Redo Brick Steps?

The cost to redo brick steps varies based on several factors:

  • Extent of Damage: Minor repairs like repointing can be relatively inexpensive, while replacing multiple bricks or addressing structural issues can be more costly.
  • Materials: Using high-quality materials like durable natural stone or sturdy concrete can increase costs but offers better longevity.
  • Labor: Professional services, like those provided by McLeod Landscaping, ensure quality but come at a price. DIY repairs can save money but may require purchasing specific tools and materials.

What Is the Best Mortar for Brick Step Repair?

Choosing the right mortar is crucial for durable repairs.

  • Type N Mortar: This is the most common choice for brick step repair due to its balance of strength and flexibility. It can handle the regular pressure of foot traffic and freeze/thaw cycles.
  • Type S Mortar: This mortar is harder and is typically used for structural applications. While it offers greater strength, it may not be as flexible as Type N.

Properly mixed mortar should not need additives to be solid and stable. Always make sure your mortar mix is appropriate for the specific needs of your brick steps.

Next, we’ll conclude with the importance of timely repairs and the benefits of professional services from McLeod Landscaping.

Conclusion

Timely repairs to brick stairs are crucial for both safety and aesthetics. Ignoring loose, cracked, or missing bricks can lead to bigger problems, including structural instability and potential accidents. Regular maintenance and prompt repairs can save you from costly overhauls down the line.

DIY vs. Professional Repair

While many homeowners may be tempted to tackle brick stair repair themselves, consider the complexity of the task. DIY repairs can be effective for minor issues if you have the right tools and follow proper guidelines. However, more severe damage or extensive repairs often require professional expertise to ensure longevity and safety.

At McLeod Landscaping, we offer comprehensive masonry services that guarantee high-quality results. Our experienced team can handle everything from minor repointing to complete brick stair replacements. We use top-grade materials and proven techniques to deliver durable and aesthetically pleasing outcomes.

McLeod Landscaping Services

With over 30 years of experience, McLeod Landscaping is your go-to expert for all your masonry needs. We specialize in a wide range of services, including:

  • Patio Installation: Create an outdoor oasis with our custom patio designs.
  • Walkway Installation: Improve your property’s curb appeal with functional and beautiful walkways.
  • Custom Fire Pit Installation: Lift your outdoor gatherings with a custom fire pit.
  • Front Stairs and Step Installation: Make a lasting impression with expertly crafted front stairs and steps.
  • Retaining Wall Installation: Manage sloped terrain and define spaces with sturdy retaining walls.

For more information about our services, visit our Walkway Installation Services page.

Timely repairs and professional expertise can make all the difference in maintaining the safety and beauty of your brick stairs. Trust McLeod Landscaping to deliver exceptional results that stand the test of time.


Contact Us Today

Contact McLeod Landscaping today at (978) 640-0957 or click here to schedule a consultation for retaining wall installation. Let our experienced team design and install a functional and visually appealing retaining wall that enhances your landscape.

McLeod Landscaping Brick Stair Repair: Solutions for Loose, Broken, or Missing Bricks

Table Of Contents

Landscape & Hardscape Professionals Servicing , MA

McLeod Landscaping, Inc.

1881 Main St Unit 1, Tewksbury, MA 01876

Stay Connected